|
| OO Scale | N Scale | G Scale | Z Scale | HO Scale | Slot Cars & R⁄C |
| |||||||
|
|||||||
| Home Page | |||||||
| BUY GIFT VOUCHERS | |||||||
| Products | |||||||
| Latest News | |||||||
| RIGHT LINES | |||||||
| Bargains | |||||||
| Downloads | |||||||
| Events | |||||||
| Careers & Jobs | |||||||
| Carriage Services | |||||||
| About Us | |||||||
| Contact Us | |||||||
| Pay Us A Visit | |||||||
| Meet The Staff | |||||||
| Links | |||||||

| SHOPPING BASKET |
Your shopping basket is empty. To add an item, click the "Buy" button
| YOUR ACCOUNT | ||
|
||||
 |
||||
| Prodigy Advance Digital System |
||||
| Cased Controllers |
||||
| Panel Mount Controllers |
||||
| Walkabout Controllers |
||||
| Modules & Transformers |
||||
| Scenics & Accessories |
||||
| Wiring & Electrical Components |
||||
| Tiny Signs | ||||
| Tools | ||||
 |
||||
| RECENTLY VIEWED |
| GF42-146 - Scenecraft Highley Station Yard Crane (Pre-Built) | ||
| PK35261 - Weatherproof On/Off Control Box (4 Accessories) | ||
| B36-082 - Pigs (10) Figure Set | ||
| FA180914 - Blue Dumpsters (2) Kit | ||
| OD76ATV008 - Austin ATV Newcastle & Gateshead Fire Service | ||
| More ›› |
| O Scale | Wargaming | Architectural | Narrow Gauge | Tools+ | ||
Water Effects

In his continuing series of articles, NICK DUXFIELD explains how to add water effects to your layout.
Streams, canals, harbours and the sea can all be represented on your layout. Don't try to use real water - it won't look realistic in a model context. There is a variety of specially formulated media available for creating both turbulent and calm water that look true to life.
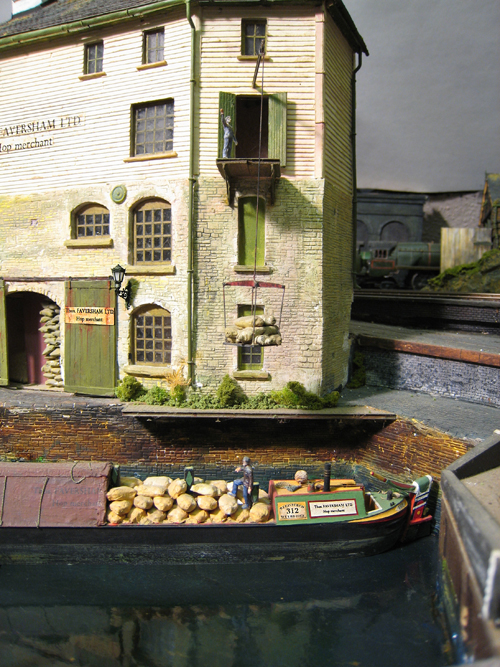
The still water of ponds, canals and sheltered harbours is the most easily modelled. The illusion of real water comes from a combination of reflections on the surface of the water and the colour of the bottom of your pool or river. In real life the sky plays a huge part too, but most layouts are seen under indoor lighting that cannot easily be made to replicate outdoor conditions.
For your model it will be trees, waterside buildings, the riverbank, stone and brick quaysides that provide these reflections. The taller these features are the more effective the reflections will be.
There are several products which you can choose from for creating your 'water', ranging from high gloss varnish to 'two-part', thermosetting systems which when mixed harden into a glass clear solid after pouring into the location you have prepared
for your water feature.
Deluxe Scenic Water DLBD-43, is one of several thermoplastic products which is heated through until melted and then poured into your water feature. As it cools and begins to set it can be stirred around with a cocktail stick and made to represent the foamy tops of breaking waves and rough water. A vigorous shake in its pot, to incorporate air bubbles, before pouring will enhance the effect. Scenic Water can be softened or re-melted with a hairdryer.
Water Effects N60872 is a very versatile product from Noch which comes as a thickish white paste. The unique features of this material are that it can be brushed out smooth or formed into wavelets, even the tumbling water of rapids. After a few days it cures to a flexible, glass clear solid. If you are thinking of a winter scene it also makes excellent icicles.
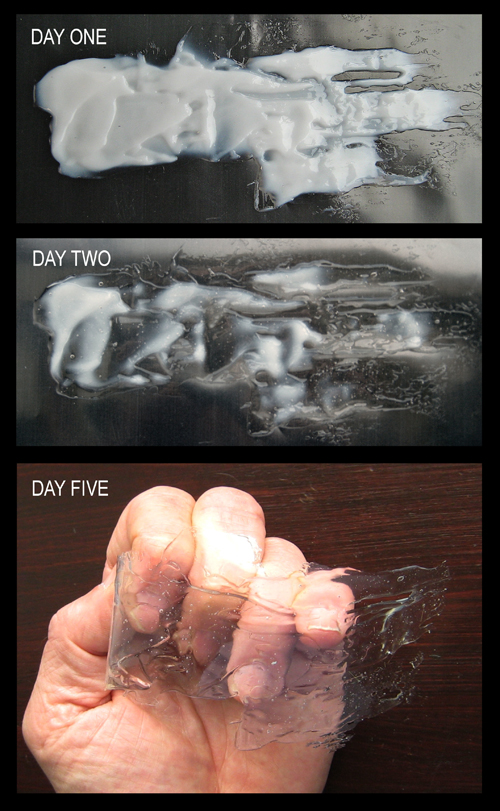
Waterfalls can be created by brushing this product onto a piece of polythene sheet (above) taped to dark card to keep the polythene taut and enable you to see what you are doing against a dark background. Over the course of a few days, depending on the thickness of the medium, it will cure to a glass clear, flexible sheet with whatever surface texture you have worked up with your brush.
It is not necessary to apply these products thickly to simulate depth - it is the way you paint the bed of your water feature that creates the illusion, two or three mm will allow you to model a stony bottom. The fast moving water uses the Noch Water Effects, mentioned above, brushed straight onto a bottom which had been primed with white acrylic and then painted with a light green for the shallows, shading to a blue, darkening to black on the outside of the bend where the water is deepest. Thin
streaks of white simulate the foam and bubbles of breaking water and the faster currents around and between rocks. The Water Effects averages 3mm deep, thickest where there are wavelets or the current piles up against boulders, thinner in the calmer
reaches.
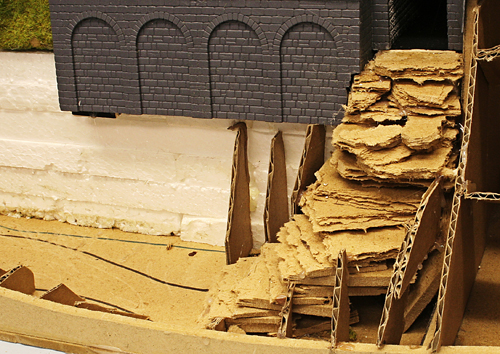
Fast streams with rocks, rapids and waterfalls are not difficult to make. A rough base for some rapids is built up from broken pieces of soft insulation board fastened into position with the trusty glue gun.
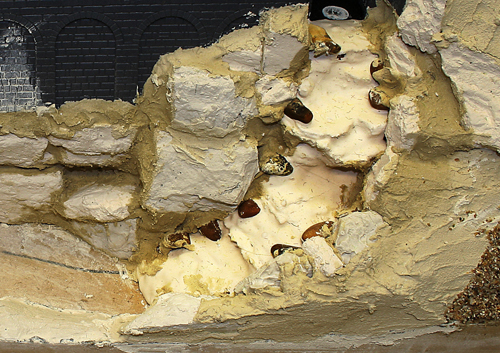
Next, using plaster, create the bottom for your stream where it is falling steeply. Push rounded pebbles into the wet plaster, placing them so that the water will follow a sinuous course. Where the stream levels out, glue the pebbles straight onto the MDF bottom. The riverbank, in this case a rock face, is an inherent part of this operation and should be worked on together with the river bottom.
Choose pebbles and stones that are appropriate for the state of the river - well rounded where they have been tumbled by fast moving water, less worn and rougher for the placid stretches. Don't worry about colour when you choose your stones, you will be painting all this before you apply the water.

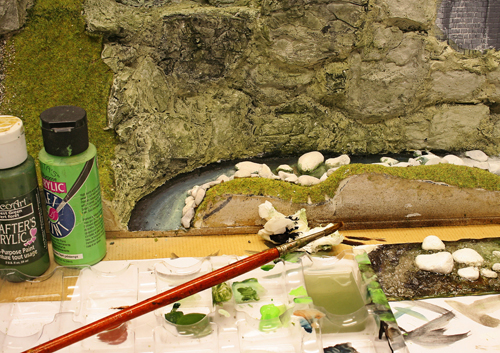
Paint the bottom of the rocks and stones - if you are in doubt as to how the effects will turn out, have a practice first on a bit of card - I certainly find this helpful. Now paint the stones. The colour you choose, just as for rock outcroppings, will depend on the area you have chosen as the location for your railway - whatever its colour, wet stone is darker than dry. In calm waters green weed will have grown below water level on rocks, docksides and piling.

Be certain that the rocks and bottom are fully dry before brushing on the Noch Water Effects. The river bed illustrated,
downstream of the brush is as painted, the rather unpromising white gloop upstream is freshly painted on Water Effects
medium. Because it does not run you can easily work it with a small, flat, springy brush to achieve the water surface you
want. The full effect of your efforts will become apparent after two or three days when, depending on thickness, the Water
Effects turns crystal clear.
There are colours available for tinting these 'water' media. If you choose to use them be very sparing - too much and your water effect will not look real. Perhaps the only occasions for use would be if are modelling rivers coming off moorland when peat will have given the water a brownish tint, or in locations where the water is muddy or polluted.
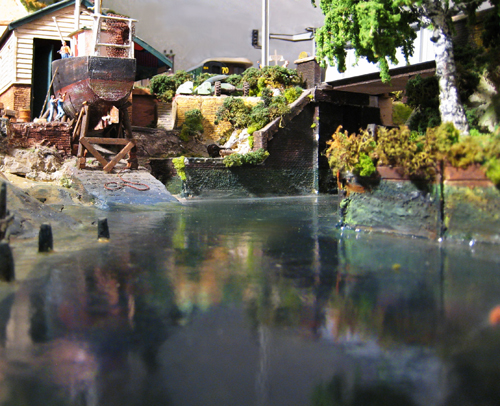
The still water to your left was achieved with several coats of gloss varnish. A very lightly rippled surface will give you more distorted reflections and is best done when painting the bottom. Non-flowing, tubed acrylic paint can be worked with your brush to provide the subtle textures needed.
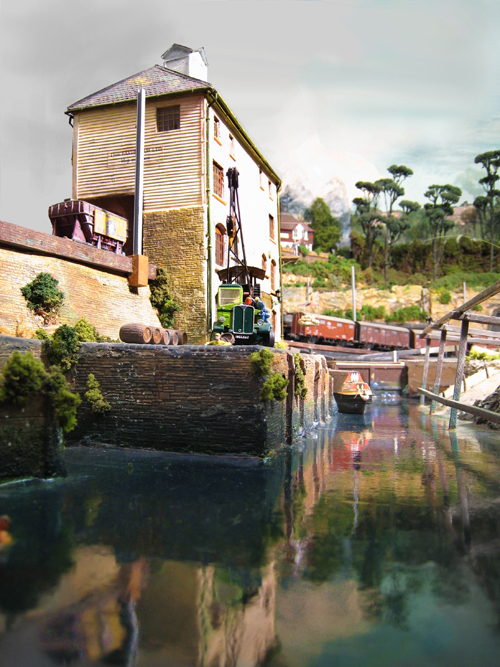
For well defined reflections you will need the 'glassy' surface finish provided by the pourable water media such as Deluxe
Solid Water DL16A or Noch N60870. Darker bottoms generate clearer reflections - over-darkening can interfere with your
definition of shallow and deep water, so you will need to compromise.
Don't forget to make your water feature absolutely 'watertight', carefully sealing all potential points of leakage before pouring liquid media.
This article is adapted from the Gaugemaster Scenic Guide produced back in 2008. Although out of print a PDF copy can be viewed here![]() . Right click on the link and select 'Save Link As' to download the Guide rather than open it in your browser.
. Right click on the link and select 'Save Link As' to download the Guide rather than open it in your browser.
|


We are always looking to make improvements to our website to try and improve the quality of your visit. We would welcome your feedback and suggestions, so please do not hesitate to e-mail our webmaster with your comments. Alternatively call us on 01903 884488.
Home Cookies Privacy Statement Terms & Conditions Site Map Site Guide
WEEE Regulations Glossary Careers & Jobs
Tel – +44 (0) 1903 884488 Fax – +44 (0) 1903 884377 E-Mail us – click here
Gaugemaster.com is a trading name of Gaugemaster Controls Ltd.
Registered in England No. 2714470, Registered office:
Gaugemaster House, Ford Road
Arundel, West Sussex, BN18 0BN, United Kingdom
VAT Reg. No. 587 8089 71
Copyright © 2003-2014 Gaugemaster Controls Ltd. All Rights Reserved.