|
| OO Scale | N Scale | G Scale | Z Scale | HO Scale | Slot Cars & R⁄C |
| |||||||
|
|||||||
| Home Page | |||||||
| BUY GIFT VOUCHERS | |||||||
| Products | |||||||
| Latest News | |||||||
| RIGHT LINES | |||||||
| Bargains | |||||||
| Downloads | |||||||
| Events | |||||||
| Careers & Jobs | |||||||
| Carriage Services | |||||||
| About Us | |||||||
| Contact Us | |||||||
| Pay Us A Visit | |||||||
| Meet The Staff | |||||||
| Links | |||||||

| SHOPPING BASKET |
Your shopping basket is empty. To add an item, click the "Buy" button
| YOUR ACCOUNT | ||
|
||||
 |
||||
| Prodigy Advance Digital System |
||||
| Cased Controllers |
||||
| Panel Mount Controllers |
||||
| Walkabout Controllers |
||||
| Modules & Transformers |
||||
| Scenics & Accessories |
||||
| Wiring & Electrical Components |
||||
| Tiny Signs | ||||
| Tools | ||||
 |
||||
| O Scale | Wargaming | Architectural | Narrow Gauge | Tools+ | ||

Modifying The Fordhampton GM405 1960's Three Bedroom House Kit

TERRY SMITH looks at how to customise this versatile kit from the Gaugemaster Structures range.
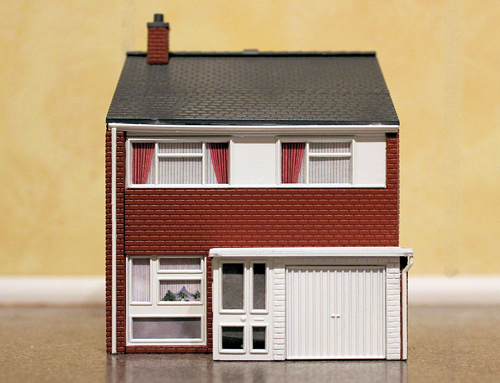
Finished House as supplied.
Firstly we can look at what parts can be painted to improve the model. Due to the limitation of moulding the sprues it is impossible for us to make these kits in any more different colours than we already do, so its time to open the paint box. These houses would have been built in period with white painted wooden frames and in later years these frames may have been replaced with white UVPC double glazed units so we do not need to touch them. However when built and even today the gutters and drain pipes would have generally been black, so a quick lick of your favourite brand of either enamel or acrylic black paint will rectify this. Personally I prefer to work with enamels with the Revell range offering great choice at reasonable prices, and would even use a gloss black on these parts.
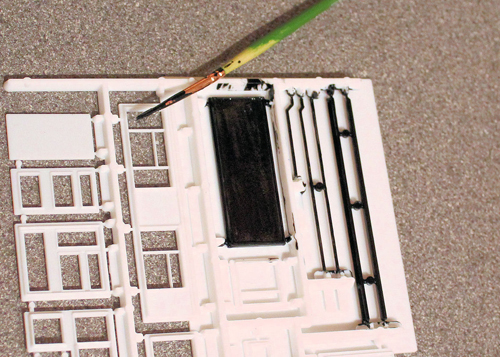
Drain pipes painted black.
Next up for painting would be the garage door, and of course the colour you paint this would be down to personal preference - and possibly just down to what paint you currently have. The front and rear doors could also have a lick of paint along with the panels that separate the upstairs windows, but again this would be down to personal choice. One part that does stand out as a must paint is the flat roof that is over the porch and garage door. Whilst I acknowledge that many a similar roof could be covered in white chippings I think you can improve the look of the model by painting this either black or grey.
I have even gone one stage further by using GM115 N Scale Granite Ballast which was sprinkled onto Deluxe Materials DLAD-11 Speed Bond after the roof has already been painted black. This ballast can also be used to create realistic paths and driveways in the grounds of your house. The garage door to me is just begging to be modelled in an open or part open state, and this is achieved by trimming away the side mounting lip. If you wish to have the door fully open then it gives one the opportunity to fill the space with all the things that people put in their garages - with lawnmowers, ladders and bicycles being obvious choices, a quick look through the Noch range should give you some suitable items. Of course (heaven forbid) you could actually have a car from the comprehensive OO range of Oxford Diecast models living in its rightful place! If you are going to open the garage up, you will need to cut away the front wall moulding that hides behind the door and create garage walls with Slaters Plasticard.
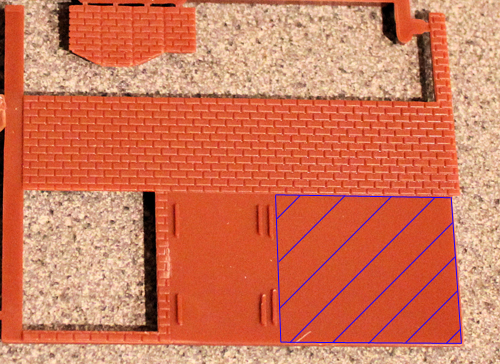
Remove shaded area if you want to have the garage door open.
Another area that can benefit with painting is the brickwork that surrounds the garage entrance. In this instance I used Railmatch RM2424 Dark Brick to accomplish this and also used this colour on the chimney pot to good effect. You can also see in the picture below that I have painted the floors of the bedrooms to simulate carpeting should one wish to look into the windows.
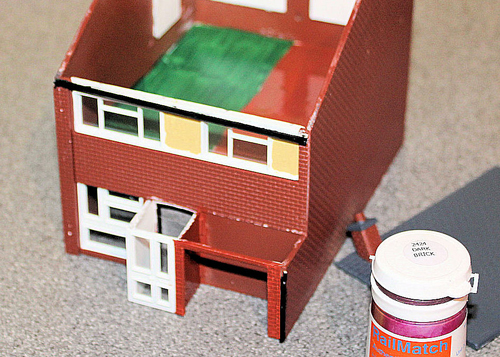
Painted Garage brickwork, chimney and floors.
This kit comes supplied with printed sheet that when cut out and placed behind the glazing does a pretty good job of replicating curtains and blinds. However you dont have to use them as the house comes with a first story floor, one could go to town kitting out bedrooms etc by using suitable models or scratch built furniture. The other option is to cut out parts of the curtains and with a few well placed GM71 Grain of Wheat Bulbs one can give the impression that the house is lived in.
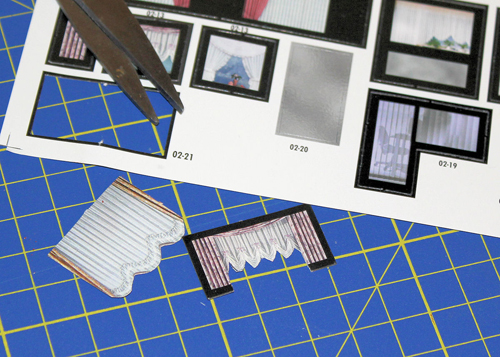
Trim or even totally leave out the supplied curtains.
Property like this was rarely built on their own so buy purchasing a few kits one can create a street or even a whole estate. Correct time period for this type of house is from late steam right up today, so we are looking at them being compatible with a huge range of model railway stock.
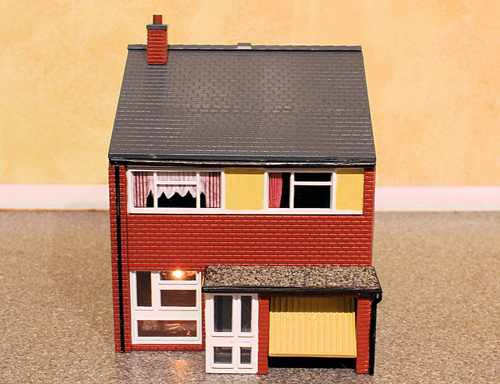
The completed model.
|


We are always looking to make improvements to our website to try and improve the quality of your visit. We would welcome your feedback and suggestions, so please do not hesitate to e-mail our webmaster with your comments. Alternatively call us on 01903 884488.
Home Cookies Privacy Statement Terms & Conditions Site Map Site Guide
WEEE Regulations Glossary Careers & Jobs
Tel – +44 (0) 1903 884488 Fax – +44 (0) 1903 884377 E-Mail us – click here
Gaugemaster.com is a trading name of Gaugemaster Controls Ltd.
Registered in England No. 2714470, Registered office:
Gaugemaster House, Ford Road
Arundel, West Sussex, BN18 0BN, United Kingdom
VAT Reg. No. 587 8089 71
Copyright © 2003-2014 Gaugemaster Controls Ltd. All Rights Reserved.