|
| OO Scale | N Scale | G Scale | Z Scale | HO Scale | Slot Cars & R⁄C |
| |||||||
|
|||||||
| Home Page | |||||||
| BUY GIFT VOUCHERS | |||||||
| Products | |||||||
| Latest News | |||||||
| RIGHT LINES | |||||||
| Bargains | |||||||
| Downloads | |||||||
| Events | |||||||
| Careers & Jobs | |||||||
| Carriage Services | |||||||
| About Us | |||||||
| Contact Us | |||||||
| Pay Us A Visit | |||||||
| Meet The Staff | |||||||
| Links | |||||||

| SHOPPING BASKET |
Your shopping basket is empty. To add an item, click the "Buy" button
| YOUR ACCOUNT | ||
|
||||
 |
||||
| Prodigy Advance Digital System |
||||
| Cased Controllers |
||||
| Panel Mount Controllers |
||||
| Walkabout Controllers |
||||
| Modules & Transformers |
||||
| Scenics & Accessories |
||||
| Wiring & Electrical Components |
||||
| Tiny Signs | ||||
| Tools | ||||
 |
||||
| RECENTLY VIEWED |
| PR45212 - Hand Cart/Barrow/Tools Kit | ||
| FM6526 - Spare Coupling with Rivet and Slot Fitting | ||
| GM2210201 - Class 73 E6003 BR Green | ||
| ODNQ1007 - Q1 BUT Trolleybus Cardiff (Streamline) | ||
| N12800 - On the Platform Sound Scene | ||
| More ›› |
| O Scale | Wargaming | Architectural | Narrow Gauge | Tools+ | ||
Reverse Loops Part 2
Reverse Loops on DCC Layouts

In the second part of a three part series, JAMES HICKMAN explains Reverse Loops on digital layouts.
In part one of this series on reverse loops I covered reverse loops on analogue layouts. This is brilliant if you are controlling your layout for analogue, but what about those using DCC control? Thats where this article comes in. As previously explained, a reverse loop on any layout will cause a short when connected up as opposing rails connect. This may not seem like an issue when using DCC as it operates on alternating current, but in reality it is exactly the same problem as with analogue layouts. This is because the two rails are constantly switching between positive and negative - and although both sides are doing this, you will find that with a reverse loop the short still occurs. This is down to the fact that the two rails are switching consistently to the opposing polarity as the other rail. In brief, you do still get the same problem as you do in analogue.
So whats the cure?
In the previous article we showed you how to wire up a reverse loop to allow the track formation to work on analogue. The diagrams shown can be used to wire the DCC controlled track in the same way, the downside being you do still need to stop the train. This of course defeats some of the purpose of operating in DCC. There is a simple solution however, and that is to install an Auto-Reverse module.
What are Auto-Reverse modules?
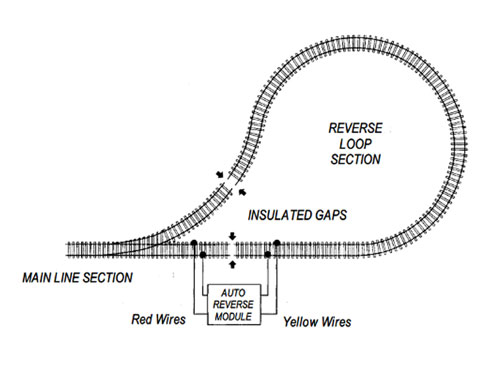
These modules do exactly as their name suggests, they automatically reverse the polarity of the reverse loop. As with the analogue wiring you do still need to isolate the four rails of your point. This is easily done by using plastic rail joiners. Once installed the rails no longer cause a short. Thats step one done.
Step two it simple, connect your Auto-Reverse module into the circuit. If using the Gaugemaster DCC40 Auto-Reverse Module simply connect the unit as shown in the digram below. Once installed, welcome to the world of automatic polarity change on your DCC reverse loops.
Do I have to use the DCC40?
The Gaugemaster DCC40 Auto Reverse Module is designed and built to the NMRA standards and should work with the majority of digital controllers. It is unfortunate however, that because of the design of some of the more basic systems, it does not work with all of them. Some systems operate in a slightly different way to many of the other systems on the market, and because of this the DCC40 is not suitable when using either of the Hornby or Bachmann systems.
Does this mean I can't use a reverse loop module with these systems?
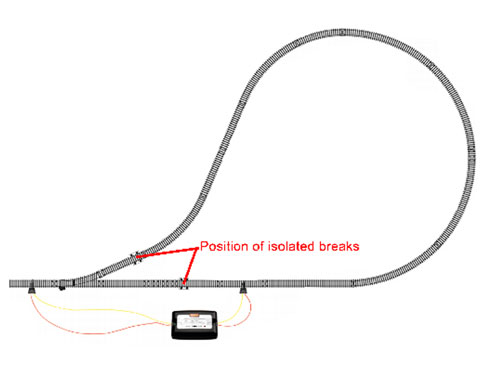
Although you can't use the DCC40 with theses systems, it doesnt mean that reverse loops cannot be overcome in the same way. All you simply need is the Reverse Loop module produced by the relevant manufacturer. If you are using any of the Bachmann systems you would need to use the Bachmann E-Z Command Reverse Loop Module (B36-525) and the Hornby Reverse Loop Module (R8238) if you are using a Hornby digital controller. The Hornby reverse loop module is installed in a similar way to the DCC40. The wiring diagram is shown below:
Unfortunately at the time of publication I have been unable to find a copy of the instructions for the Bachmann E-Z Command Reverse Loop Module and am unable to provide a diagram for the installation. Hopefully this will be included at the start of part three of the reverse loop series. If you do need a Bachmann E-Z Command Reverse Loop Module for your layout, be sure to consult the instructions provided with the unit prior to installation.
Where next?
That concludes part two of the article on Reverse Loops, keep a lookout for part three in a forthcoming issue of Right Lines. The third and final instalment of the series will cover the more advanced situations where a reverse loop occurs, for example if two reverse loops are present on one circuit and those pesky track arrangements known as triangles.
Part 3 coming soon...
|


We are always looking to make improvements to our website to try and improve the quality of your visit. We would welcome your feedback and suggestions, so please do not hesitate to e-mail our webmaster with your comments. Alternatively call us on 01903 884488.
Home Cookies Privacy Statement Terms & Conditions Site Map Site Guide
WEEE Regulations Glossary Careers & Jobs
Tel – +44 (0) 1903 884488 Fax – +44 (0) 1903 884377 E-Mail us – click here
Gaugemaster.com is a trading name of Gaugemaster Controls Ltd.
Registered in England No. 2714470, Registered office:
Gaugemaster House, Ford Road
Arundel, West Sussex, BN18 0BN, United Kingdom
VAT Reg. No. 587 8089 71
Copyright © 2003-2014 Gaugemaster Controls Ltd. All Rights Reserved.