|
| OO Scale | N Scale | G Scale | Z Scale | HO Scale | Slot Cars & R⁄C |
| |||||||
|
|||||||
| Home Page | |||||||
| BUY GIFT VOUCHERS | |||||||
| Products | |||||||
| Latest News | |||||||
| RIGHT LINES | |||||||
| Bargains | |||||||
| Downloads | |||||||
| Events | |||||||
| Careers & Jobs | |||||||
| Carriage Services | |||||||
| About Us | |||||||
| Contact Us | |||||||
| Pay Us A Visit | |||||||
| Meet The Staff | |||||||
| Links | |||||||

| SHOPPING BASKET |
Your shopping basket is empty. To add an item, click the "Buy" button
| YOUR ACCOUNT | ||
|
||||
 |
||||
| Prodigy Advance Digital System |
||||
| Cased Controllers |
||||
| Panel Mount Controllers |
||||
| Walkabout Controllers |
||||
| Modules & Transformers |
||||
| Scenics & Accessories |
||||
| Wiring & Electrical Components |
||||
| Tiny Signs | ||||
| Tools | ||||
 |
||||
| RECENTLY VIEWED |
| N07343 - Dark Green Structure Foam 5mm (15g) | ||
| OD76SHL06WF - Stobart Lorry Tony McCoy | ||
| GF42-146 - Scenecraft Highley Station Yard Crane (Pre-Built) | ||
| PK62814 - North Pole Icicles Set | ||
| ODNFT034 - Ford Transit MkV Van Parcelforce | ||
| More ›› |
| O Scale | Wargaming | Architectural | Narrow Gauge | Tools+ | ||
Soldering Basics

CRAIG WEATHERLEY takes you through the basics of soldering for beginners.
Have you ever been stuck on how to solder, but would like to give it a go? Well Im here to give you a brief guide on basic soldering.
What you will need
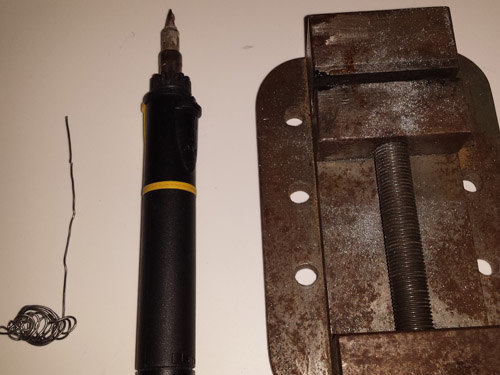
- Soldering Iron
- Solder
- Wire Strippers
- Soldering Stand
- Holding Device
Soldering is a process in which two metal items are joined together by melting or flowing filler metal (solder) into the joint. As the solder has got a lower melting point than the wire or metal being used, the solder will melt into a liquid and set in the gaps producing a conductive joint. When solder dries shiny its a good conductive joint but if the solder is a dull grey colour then its a bad conductive joint. Always solder over a protected surface, not the kitchen table just before Christmas dinner!
Flux is a liquid used to help the solder flow better. It is usually acid-based which 'roughens up' the surfaces of the metal to increase adhesion. If you use a pre-fluxed solder then you don't need to worry about using a separate flux.
I sometimes get asked about which wattage of soldering iron to use on certain materials. If the job is standard wiring or detailing parts then a simple 25W or even 15W soldering iron will be fine.
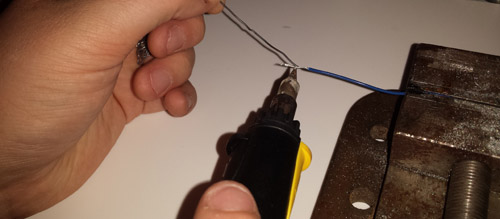
I am now going to take you through step by step guide to basic wire soldering.
- Make sure your iron is hot enough by touching a little solder on the tip of the iron.
- Strip about 10mm of sheathing away from the wire and support in your holding device (remembering to strip the other wire as well)
- Coat the solder tip with a thin layer of solder (this process is called tinning).
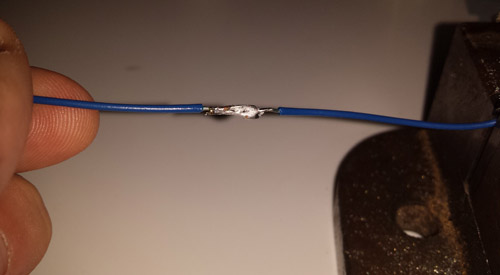
- Twist both pre-tinned wires together to make a physical connection, and apply the soldering iron until the solder flows around the wires encasing them.
- Allow to cool for about 5-10 seconds and remove from holding device.
A fundamental aspect of soldering is cleaning between soldering different joints, as failing to do this results in bad joints and allows the solder to corrode the iron tip. You should clean the tip on a wet sponge (a sponge is usually provided in the soldering iron set).
Craig will be following up this article at a later date with more advanced soldering methods.
|


We are always looking to make improvements to our website to try and improve the quality of your visit. We would welcome your feedback and suggestions, so please do not hesitate to e-mail our webmaster with your comments. Alternatively call us on 01903 884488.
Home Cookies Privacy Statement Terms & Conditions Site Map Site Guide
WEEE Regulations Glossary Careers & Jobs
Tel – +44 (0) 1903 884488 Fax – +44 (0) 1903 884377 E-Mail us – click here
Gaugemaster.com is a trading name of Gaugemaster Controls Ltd.
Registered in England No. 2714470, Registered office:
Gaugemaster House, Ford Road
Arundel, West Sussex, BN18 0BN, United Kingdom
VAT Reg. No. 587 8089 71
Copyright © 2003-2014 Gaugemaster Controls Ltd. All Rights Reserved.