|
| OO Scale | N Scale | G Scale | Z Scale | HO Scale | Slot Cars & R⁄C |
| |||||||
|
|||||||
| Home Page | |||||||
| BUY GIFT VOUCHERS | |||||||
| Products | |||||||
| Latest News | |||||||
| RIGHT LINES | |||||||
| Bargains | |||||||
| Downloads | |||||||
| Events | |||||||
| Careers & Jobs | |||||||
| Carriage Services | |||||||
| About Us | |||||||
| Contact Us | |||||||
| Pay Us A Visit | |||||||
| Meet The Staff | |||||||
| Links | |||||||

| SHOPPING BASKET |
Your shopping basket is empty. To add an item, click the "Buy" button
| YOUR ACCOUNT | ||
|
||||
 |
||||
| Prodigy Advance Digital System |
||||
| Cased Controllers |
||||
| Panel Mount Controllers |
||||
| Walkabout Controllers |
||||
| Modules & Transformers |
||||
| Scenics & Accessories |
||||
| Wiring & Electrical Components |
||||
| Tiny Signs | ||||
| Tools | ||||
 |
||||
| O Scale | Wargaming | Architectural | Narrow Gauge | Tools+ | ||
Building a Baseboard and Tracklaying

NICK DUXFIELD explains how to build a baseboard for your model railway and how to lay the first track onto it.
Baseboard building
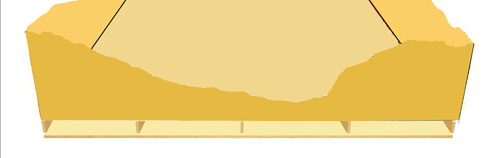
The simplest baseboard comprises a 'criss-cross' frame made from planed softwood with a plywood or MDF top. This will provide a firm base for your railway but with the drawback of not being easily adapted to accommodate hills, valleys and different levels of track.
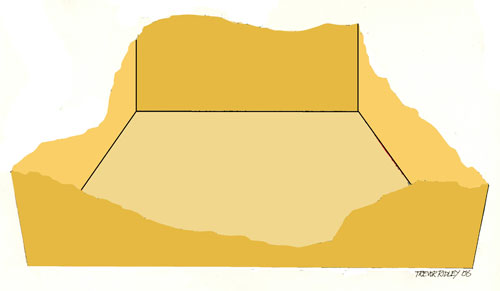
This sketch illustrates an arrangement that best provides for 'rolling countryside' and still gives a rigid base for your railway. 70mm high side and end pieces will provide sufficient stiffening for a 2440mm (8ft) x 1220mm (4ft) baseboard constructed from 6mm MDF.
If any part of a side piece on your baseboard has to be significantly less than 70mm high - for example you might intend modelling a river estuary or a stretch of line at sea level which will mean reducing parts of the side or end pieces to a degree that your baseboard may be weakened at that spot. This will matter less if the layout is to be installed in a permanent position on trestles or legs that can be positioned to give extra support at the 'weak spot'.
If your layout is to be fully portable then add a second MDF base panel to the original separated from it with 50mm strips of MDF. This approx. 50mm deep box will provide a light yet strong support for your layout.
This type of baseboard construction will, if you wish, enable you to lay your track, following a series of gentle curves, right at the edge of the baseboard - think ahead to when you can view a passing train from a few centimetres away, and literally at eye level. Impressive and virtually impossible with a conventionally braced baseboard softwood frame!
MDF is an ideal material for making scenic baseboards, it is easily cut with a jigsaw and strong joints are ensured with a good quality, fast setting PVA adhesive. Short (20mm) pieces of 18 x 28mm softwood fastened with a 'hot melt glue gun' will hold MDF pieces together while the PVA sets.
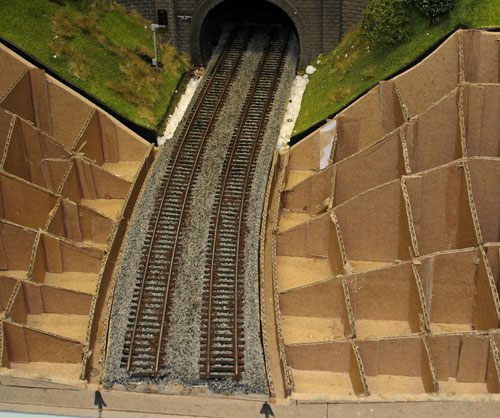
Tracklaying
It is best to lay your track and roadways before starting on the scenics. Track laying and road construction will be much easier if you cut trackbeds, of appropriate width and curvature, from 6mm MDF, on which to lay both your track and roadways onto the baseboard - gentle changes in gradient are easier to achieve, track is securely supported at bridges, and embankments aremore easily constructed with a sturdy 'top' already in place.
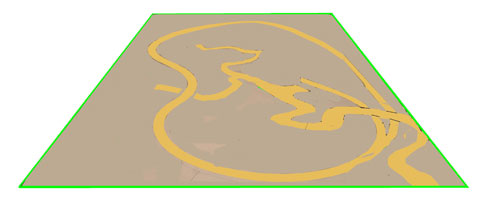
The dummy, cardboard trackbeds you will have made to help you through the planning stage can now be used as templates for accurately cutting the MDF trackbeds on which to fasten your track and create your roads.
MDF is a comparatively hard material, GM67 Track Pins have a fine shank with a very sharp point and can be driven into MDF with a GM669 Pin Pusher or pointed pliers. If the track you are going to use does not have holes at intervals in the sleepers then you will need to drill clearance holes in your sleepers every 80mm or so. A Micro Hand Drill (GM640) is a big help for making tiny holes quickly. Gaugemaster Nickel Silver, Code 100 flexible track comes with holes at appropriate spacings. GM93 has black sleepers and GM94 brown.
For realism track should be ballasted, the most effective method is with flexible, stone ballasted underlay available in both N and HO/OO gauge. Detailed instructions for using these products and tips on track laying come with the product. Paint the sides of your rails a rusty brown before laying the track.
If you intend operating your points with surface mounted point motors rather than fixing them under the baseboard, now is the time to decide whether you will hide the point motors under the scenery or in lineside buildings.
Next time we will be looking at how to continue landscaping your layout. This article is adapted from the Gaugemaster Scenic Guide produced back in 2008. Although out of print a PDF copy can be viewed here. Right click on the link and select ‘Save Link As’ to download the Guide rather than open it in your browser.
|


We are always looking to make improvements to our website to try and improve the quality of your visit. We would welcome your feedback and suggestions, so please do not hesitate to e-mail our webmaster with your comments. Alternatively call us on 01903 884488.
Home Cookies Privacy Statement Terms & Conditions Site Map Site Guide
WEEE Regulations Glossary Careers & Jobs
Tel – +44 (0) 1903 884488 Fax – +44 (0) 1903 884377 E-Mail us – click here
Gaugemaster.com is a trading name of Gaugemaster Controls Ltd.
Registered in England No. 2714470, Registered office:
Gaugemaster House, Ford Road
Arundel, West Sussex, BN18 0BN, United Kingdom
VAT Reg. No. 587 8089 71
Copyright © 2003-2014 Gaugemaster Controls Ltd. All Rights Reserved.