|
| OO Scale | N Scale | G Scale | Z Scale | HO Scale | Slot Cars & R⁄C |
| |||||||
|
|||||||
| Home Page | |||||||
| BUY GIFT VOUCHERS | |||||||
| Products | |||||||
| Latest News | |||||||
| RIGHT LINES | |||||||
| Bargains | |||||||
| Downloads | |||||||
| Events | |||||||
| Careers & Jobs | |||||||
| Carriage Services | |||||||
| About Us | |||||||
| Contact Us | |||||||
| Pay Us A Visit | |||||||
| Meet The Staff | |||||||
| Links | |||||||

| SHOPPING BASKET |
Your shopping basket is empty. To add an item, click the "Buy" button
| YOUR ACCOUNT | ||
|
||||
 |
||||
| Prodigy Advance Digital System |
||||
| Cased Controllers |
||||
| Panel Mount Controllers |
||||
| Walkabout Controllers |
||||
| Modules & Transformers |
||||
| Scenics & Accessories |
||||
| Wiring & Electrical Components |
||||
| Tiny Signs | ||||
| Tools | ||||
 |
||||
| O Scale | Wargaming | Architectural | Narrow Gauge | Tools+ | ||
Hills and Valleys

In the third of this series of articles, NICK DUXFIELD explains how to start to model the landscape.
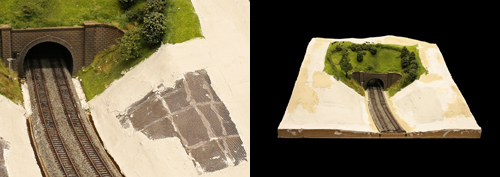
Making a Start

The above illustration shows a section of layout with the contoured MDF stiffening highlighted in red. The remaining contoured honeycomb is cut from cardboard - supermarket recycling again. A hot-melt glue gun is the speediest way of securing the cut pieces. Where buildings will be on sloping ground cut the contour pieces with a level top edge and glue down flat and level areas of appropriate sized MDF, on which to position the buildings you plan to use.
If you have planned for a still-water feature be absolutely certain that the banks of your lake or canal are perfectly level all round, you don't want your 'water' overflowing the bank or harbour wall in one spot and the bottom showing in another. Effective sealing of all potential points of leakage at this stage will save work later if your choose to use one of the pourable water products that can take a while to set.
Tumbling streams, with rocks, rapids and falls will clearly not be level. Because a different kind of non-flowing water medium will be used, there is no need for being too particular about sealing joints.
The covering for your honeycomb needs to be rigid enough to resist denting or cracking while being worked on and
provide a secure foundation for scale height trees. One method only will be described, there are others - many
with significant disadvantages. Plaster bandage, similar to that used in hospitals, is readily available to
modellers under the name Mod Roc, GM100. This material is quick to apply and fast setting, giving a strong, lightweight shell.
Before laying the Mod Roc fasten fine wire mesh to the honeycomb, Faller's FA170665 is very flexible, making it
easy to fit and fix down with the hot-melt glue gun. Chicken wire is an alternative but is unwieldy to use and
does not follow contours as smoothly and accurately as materials purpose made for the job.
Short lengths of Mod Roc are wetted, not soaked, and laid down on the mesh. Overlap the edges of the strips by about 5mm and rub gently with a finger to smooth down and key into the mesh. If there areas which need reinforcement use Fine Plaster GM119.
The Foundation for Ground Cover
Grass Mats, GM20, GM21 and GM22 are rolls of green flock covered kraft paper in Spring, Summer and Autumn grass colours. They make excellent sheep cropped meadowland and are a perfect foundation for the application of ground cover scatters and foliage to make rough pasture and wilder grassland. Use these to cover your white plasterwork rather than paint.
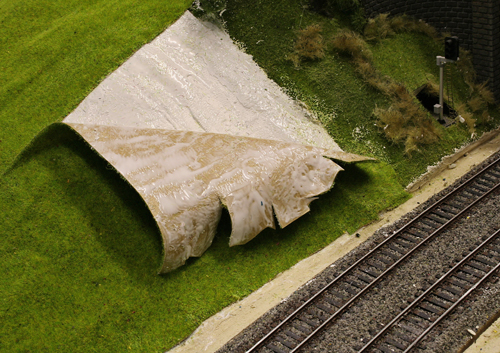
Brush a decent quality PVA adhesive, Deluxe DLAD-11 will be fine, on both the shell and the back face of the mat. Work in smallish areas at a time, around 300 x 300mm is OK and make 10 - 15mm snips into the edges to help fitting into 'difficult areas'. Bare patches of plaster can be covered over later with scatter. Apply one edge of the mat first then, smoothing down as you go, lay the rest of the piece.
Don't worry about the odd wrinkle or visible edge, these can all be covered over later. Clearly golf greens and cricket pitches, if you are having them, need to be pristine but you will already have provided an ultra smooth surface for these. If necessary, GM119 plaster, will help here.
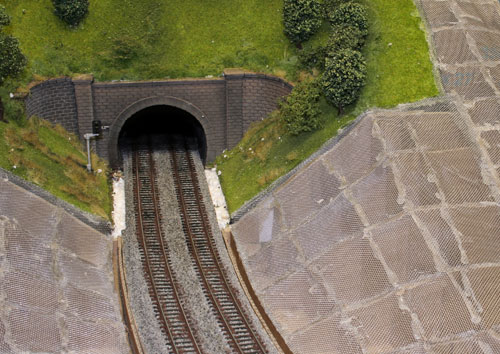
Rock Faces and Walling
Rocky out-crops, stone retaining walls and tunnel portals all contribute to a dramatic model railway. At an early stage in your planning you will have decided whether your railway is to have these features and where they are to be located.
Rock faces can be reproduced using DIY products such as Polyfilla . However this material cannot be shaped effectively until it is just beginning to harden, at this stage it can be carved into very realistic rock faces - providing you work with small areas at a time. Once hard these fillers become difficult to carve effectively. This approach is time consuming and the longer the work takes and tedium sets in, sadly, the less convincing the appearance sometimes seems to become.
Flexible moulds are available for plaster casting, and are really effective, faithfully reproducing a variety of different rock formations, consult your Noch catalogue for more details. Fine plaster (GM119), will faithfully pick up all the detail from these moulds, casting a thin but very hard shell which can be glued into position with a little Polyfilla . This method allows you to easily blend your rocks together and to your Mod Roc shell.
Alternatively packs of preformed and coloured rock are available, moulded in 'hard foam' (Styrofoam) either as pieces of rock or in 320mm x 180mm slabs, dependent on the type of rock they represent. All of these accurately represent specific types of rock, are very realistic, lightweight, easily fixed and can be cut to fit awkward spaces. Cut faces can be easily carved and shaped.
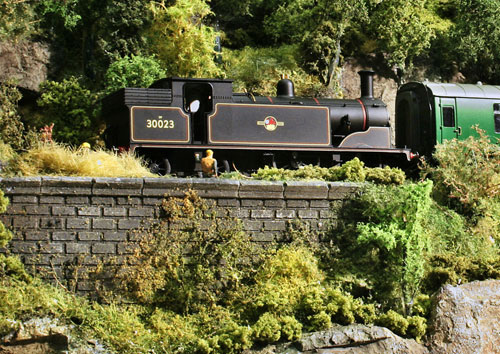
Stone or brick retaining walls hold back unstable cutting sides and embankments. The Victorian railway engineers used building materials most readily available to where they were working. If the line cut through clay soils then bricks would be fired on site and used for the masonry work. Stone would be used if it were more readily available. Other buildings in the area will often have been built of similar materials to those being used on the railway.
Tunnels become necessary when hills cannot be avoided and then only when the approach cutting becomes so deep that it is more economical to tunnel through the high ground. Similarly when the line is crossing a valley or low ground a bridge or viaduct will be built only when the height of an embankment becomes unmanageable.
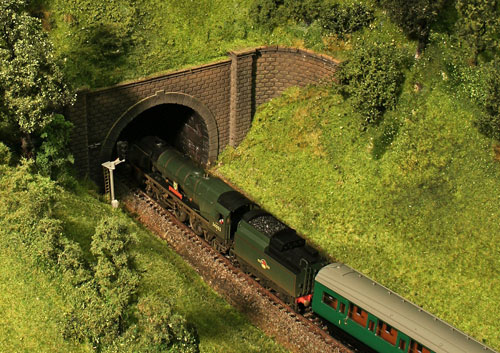
There are different shapes of tunnel mouth depending on whether brick or stone has been used and in some cases portals feature elaborate masonry, even being built to resemble small castles. There are many to choose from and some are listed atthe end of this booklet. They are made from either polystyrene or styrofoam. Both carry a high level of detail and styrofoam has a further benefit as it can be made to take a permanent curve, if required, by
dunking in hot water until softened, forming the curve - using a tin can as a former and then cooling under a running tap. This is a useful property if you want curved wing walls for a tunnel mouth.
Most tunnels are lined with either brick or stone and for realism you need to create such a lining for at least 30 or 40mm beyond the tunnel portal.
Using Polyfilla , or similar, to fasten rock materials and tunnel portals into position makes it easy for you to make a realistic join with adjacent rock. Solvent based adhesives and paint should not be used with Styrofoams.
This article is adapted from the Gaugemaster Scenic Guide produced back in 2008. Although out of print a PDF copy can be viewed here. Right click on the link and select ‘Save Link As’ to download the Guide rather than open it in your browser.
|


We are always looking to make improvements to our website to try and improve the quality of your visit. We would welcome your feedback and suggestions, so please do not hesitate to e-mail our webmaster with your comments. Alternatively call us on 01903 884488.
Home Cookies Privacy Statement Terms & Conditions Site Map Site Guide
WEEE Regulations Glossary Careers & Jobs
Tel – +44 (0) 1903 884488 Fax – +44 (0) 1903 884377 E-Mail us – click here
Gaugemaster.com is a trading name of Gaugemaster Controls Ltd.
Registered in England No. 2714470, Registered office:
Gaugemaster House, Ford Road
Arundel, West Sussex, BN18 0BN, United Kingdom
VAT Reg. No. 587 8089 71
Copyright © 2003-2014 Gaugemaster Controls Ltd. All Rights Reserved.