|
| OO Scale | N Scale | G Scale | Z Scale | HO Scale | Slot Cars & R⁄C |
| |||||||
|
|||||||
| Home Page | |||||||
| BUY GIFT VOUCHERS | |||||||
| Products | |||||||
| Latest News | |||||||
| RIGHT LINES | |||||||
| Bargains | |||||||
| Downloads | |||||||
| Events | |||||||
| Careers & Jobs | |||||||
| Carriage Services | |||||||
| About Us | |||||||
| Contact Us | |||||||
| Pay Us A Visit | |||||||
| Meet The Staff | |||||||
| Links | |||||||

| SHOPPING BASKET |
Your shopping basket is empty. To add an item, click the "Buy" button
| YOUR ACCOUNT | ||
|
||||
 |
||||
| Prodigy Advance Digital System |
||||
| Cased Controllers |
||||
| Panel Mount Controllers |
||||
| Walkabout Controllers |
||||
| Modules & Transformers |
||||
| Scenics & Accessories |
||||
| Wiring & Electrical Components |
||||
| Tiny Signs | ||||
| Tools | ||||
 |
||||
| O Scale | Wargaming | Architectural | Narrow Gauge | Tools+ | ||

Lighting Buildings Using LEDs or Bulbs

MATT LOVELL explains how to wire up building lighting.
This can be done by using ordinary bulbs (grain of wheat, or small screw in bulbs) or by using LEDs (Light Emitting Diodes) In either case the most effective way is to wire the lights in parallel (below).

The reason for this is that if one bulb fails, the rest stay on as current is still flowing along the wire. This makes fault
finding a lot easier. The bulbs will all stay the same brightness as they are all receiving the same amount of current.
If you wire the lights in series (as shown below) the more you add the dimmer they get, as less current will be received
by the bulbs furthest away from the power supply. Also if one bulb fails then the rest will turn off as the current will
have been broken by the dead bulb.

LEDs
These are small electronic devices which give out light when a current is passed through them, as they are a diode they will only allow current to pass through them in 1 direction. Most LEDs work off very low voltage (Ours work at 1.2v) so if you are using a 12v DC system you MUST put a resistor on the positive wire in the circuit (as shown below).
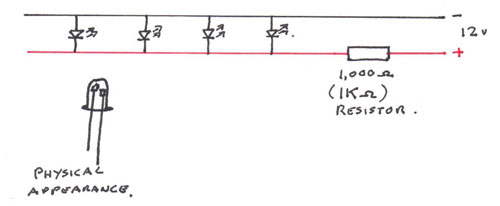
When wiring up LEDs, make sure that they are all the same way round i.e. the short legs to one feed (-) and the long legs to the other feed (+).
I find that before installing the LEDs its easier to wire them up with a suitable amount of wire on the legs so that you are not trying to use a soldering iron under the board for too long, Also try to keep to the same colours for the feeds and legs as it will be easier to trace back to the supply if there is a fault. (As shown below).

When you have wired all the LEDs up and give them a quick test with a 12v supply (through a resistor of course) to make sure that they work individually (I rigged up a pair of croc clips with a resistor on the red wire as the croc clips can connect to your track 12v supply).
After you have got all the LEDs wired in and installed link them to your 12v supply, if nothing happens just reverse the polarity and they should all come on. You can wire up a system where if one LED is wired opposite to the rest it will come on if the polarity is reversed, so you could have the reversed LED back at the control panel as a Fault Indicator (just an idea) (as shown below).

LEDs are available in various colours and sizes, the main ones we do are listed below but others are available from different manufacturers such as DCC Concepts, Faller, Train Tech and Viessmann.
GM80 3mm Green
GM81 3mm Red
GM82 3mm Yellow
GM83 5mm Green
GM84 5mm Red
GM85 5mm Yellow
The 5mm LEDs give out more light than the 3mm ones but should still have a resistor wired in the circuit as they work off the same voltage (1.2v) The resistors that I have used are GM76 as they are rated at 1000 ohms which drops the 12volt supply down to 1.2volts (perfect for our LEDs).
We also have our range of micro LEDs, although these are designed for use in vehicle lighting there are instances where they could be used in other modelling applications.
GM61 Micro White
GM62 Micro Red
GM63 Micro Blue
GM64 Micro Orange
FAQ
Q. Which supply should I use?
A. It depends on if you are using LEDs or Bulbs, If you are using Bulbs I would suggest using the Model GMC-M1 Cased
Transformer as it has 2 x 16v AC supplies.
If you are using LEDs then I would suggest the Model GMC-M1DC Cased Transformer as it has 2 x 12v DC supplies and as
both are rated at 1amp you will have enough power for a small layout. We also do the same transformers uncased but
these are for more advanced railways as they are fully open and will need a bit more wiring up and will need to be
fitted with a thermal cut-out which are sold separately (GM41).
If you are upgrading to DCC do not throw your old controller away as it can be used as a dimmer switch to control the
brightness of the bulbs, this is done by connecting the track output wires to the lighting circuit instead of a using
another transformer.
Q. How many LEDs or Bulbs can I have on one circuit?
A. This depends on the current draw of the circuit, for example bulbs draw more current than an LED so you will find
that you will get more LEDs on a circuit than Bulbs. If you find that all your bulbs fade out then you will need an
additional transformer.
Q. Why have all my bulbs stopped working?
A. This Is because of Overloading, basically there are too many bulbs on the circuit just split the circuit in half or
sectionalise it and add another transformer to the additional section.
Q. What switches should I use?
A. the best switches to use are SPST (Single Pole Single Throw) as these are just basic On/Off switches. With LEDs, Just
put the switch before the resistor in series on the positive feed, otherwise your light will stay on. With Bulbs just add
the switch before the first light.
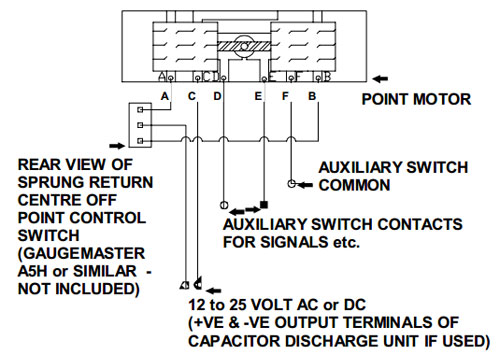
Additionally you can link LEDs to point motors by using the auxiliary outputs on the motor i.e. a Seep PM-1 (As shown below).
Matt works in our office here and has a keen head for model railway electrics.
|


We are always looking to make improvements to our website to try and improve the quality of your visit. We would welcome your feedback and suggestions, so please do not hesitate to e-mail our webmaster with your comments. Alternatively call us on 01903 884488.
Home Cookies Privacy Statement Terms & Conditions Site Map Site Guide
WEEE Regulations Glossary Careers & Jobs
Tel – +44 (0) 1903 884488 Fax – +44 (0) 1903 884377 E-Mail us – click here
Gaugemaster.com is a trading name of Gaugemaster Controls Ltd.
Registered in England No. 2714470, Registered office:
Gaugemaster House, Ford Road
Arundel, West Sussex, BN18 0BN, United Kingdom
VAT Reg. No. 587 8089 71
Copyright © 2003-2014 Gaugemaster Controls Ltd. All Rights Reserved.