|
| OO Scale | N Scale | G Scale | Z Scale | HO Scale | Slot Cars & R⁄C |
| |||||||
|
|||||||
| Home Page | |||||||
| BUY GIFT VOUCHERS | |||||||
| Products | |||||||
| Latest News | |||||||
| RIGHT LINES | |||||||
| Bargains | |||||||
| Downloads | |||||||
| Events | |||||||
| Careers & Jobs | |||||||
| Carriage Services | |||||||
| About Us | |||||||
| Contact Us | |||||||
| Pay Us A Visit | |||||||
| Meet The Staff | |||||||
| Links | |||||||

| SHOPPING BASKET |
Your shopping basket is empty. To add an item, click the "Buy" button
| YOUR ACCOUNT | ||
|
||||
 |
||||
| Prodigy Advance Digital System |
||||
| Cased Controllers |
||||
| Panel Mount Controllers |
||||
| Walkabout Controllers |
||||
| Modules & Transformers |
||||
| Scenics & Accessories |
||||
| Wiring & Electrical Components |
||||
| Tiny Signs | ||||
| Tools | ||||
 |
||||
| RECENTLY VIEWED |
| FM6526 - Spare Coupling with Rivet and Slot Fitting | ||
| ODNFT034 - Ford Transit MkV Van Parcelforce | ||
| B36-082 - Pigs (10) Figure Set | ||
| FA180914 - Blue Dumpsters (2) Kit | ||
| N07343 - Dark Green Structure Foam 5mm (15g) | ||
| More ›› |
| O Scale | Wargaming | Architectural | Narrow Gauge | Tools+ | ||
Reverse Loops Part 3

In the third part of the series, JAMES HICKMAN concludes his look at reverse loops.
Well, here it is. It's been a while coming but here is the third and final part in our look at reverse loops. In this article we will look at the more advanced situations were reverse loops occur, and other uses for the reverse loop module.
Bachmann Reverse Loop Module
First I will recap slightly. Part two looked at digital reverse loop wiring, and as we went to press, we werent able to show the wiring for the Bachmann reverse loop module. As promised however, here it is:
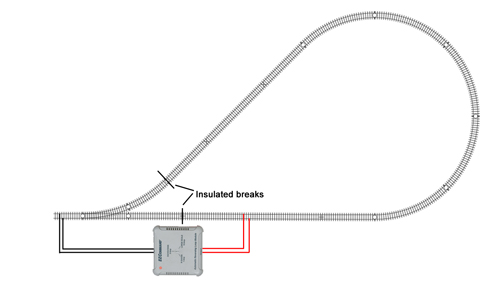
The Bachmann EZCommand Reverse Loop Module wires in in the same positions as the Hornby and Gaugemaster units and activates in the same way. If you need a refresher, the previous article can be found HERE. There is one difference with the Bachmann unit and that is the switch located on the top of the unit. This switch changes the output between 1 Amp for N gauge layouts, 2 Amps for OO/HO/On30 layouts and 10 Amps for large scale operation, so once installed, turn the switch to the correct position for your needs, and play away!
Advanced Reverse Loops
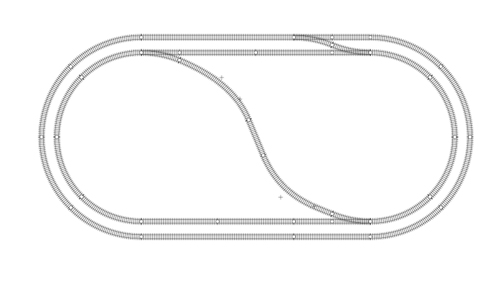
In the previous article we covered how to wire up the basic reverse loop. There are situations where reverse loops can become more complicated. The most often situation we get asked about is a double reverse loop where the two overlap. An image of this situation can be seen below, followed by a diagram showing where both reverse loops overlap.
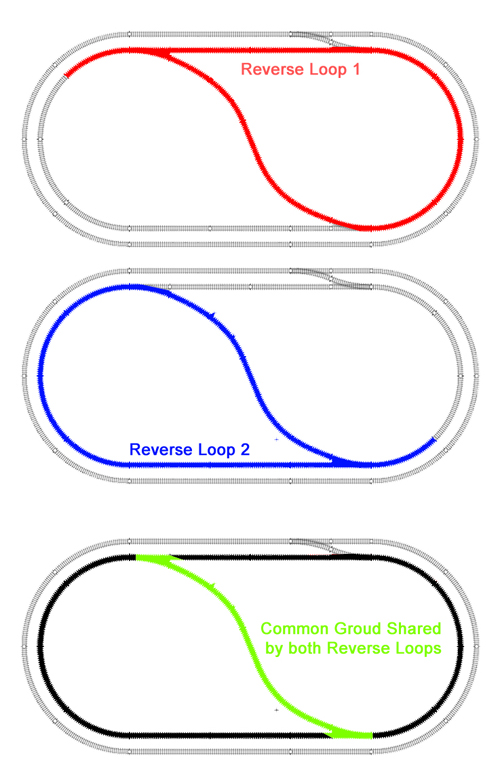
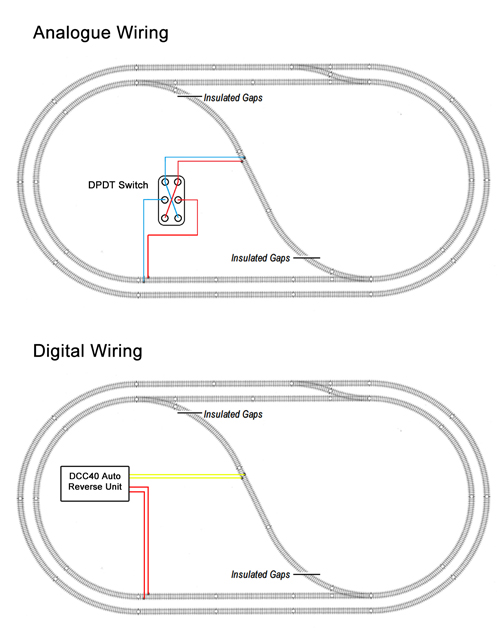
The key to solving this problem is in fact simple. Because the two loops share a common section of track, only one reverse loop module is needed. This connects to that section, as this is where the change of polarity in needed. Wiring is as simple as before:
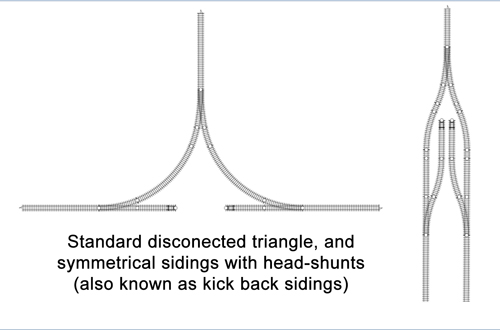
Triangles
There aren't many layouts in peoples homes or on the exhibition circuit that include a triangle, possibly due to people thinking they are going to be another nightmare of wiring. From looking at a track plan, initially there are multiple places a reverse loop module could go, acting from each point for example. The one thing to remember is that all three points connect to each other without any breaks in between. This is key because it again results in the need for only one reverse loop module.
In basic terms, when you have the three points connected in a line without the third side of a triangle being connected, you don't have a problem with a reverse loop. It simply appears as two sidings with a head-shunt on each. See diagram below:
The reverse loop problem appears when you add the connecting section:
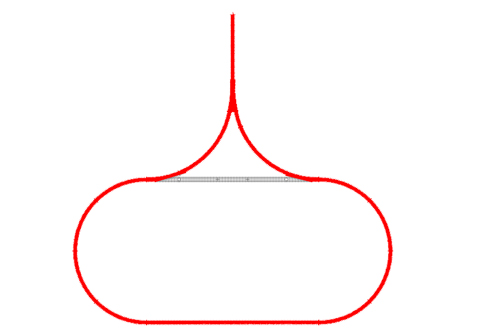
You will notice that the connecting section does not form part of the reverse loop. If you are not using the triangle as part of a circuit, you will still have feeds at each end of the triangle completing the loop:
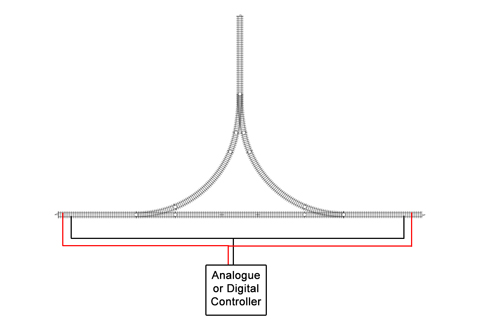
Now that we have realised we are only dealing with a simple reverse loop, the wiring again becomes simple:

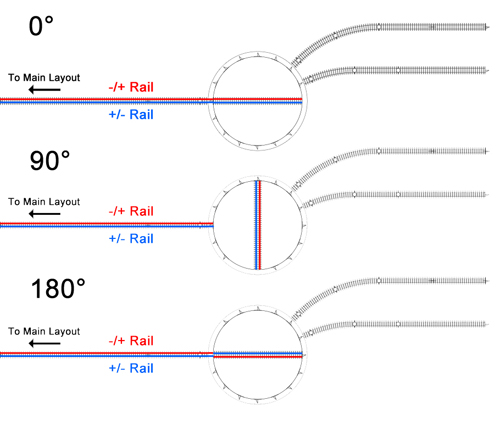
One Final Thing...
Well that's nearly the end for our series on Reverse loops, however there is a little space left to show you one final area where a polarity change over occurs, and that is with a turntable. When installing and operating a turntable you will find that when you turn the turntable past the 179° mark. It is at this point the rails of the turntable bed become the opposing polarity to those of the feeder track, see diagram below:
Yes, you've guessed it, it wires up simply to:
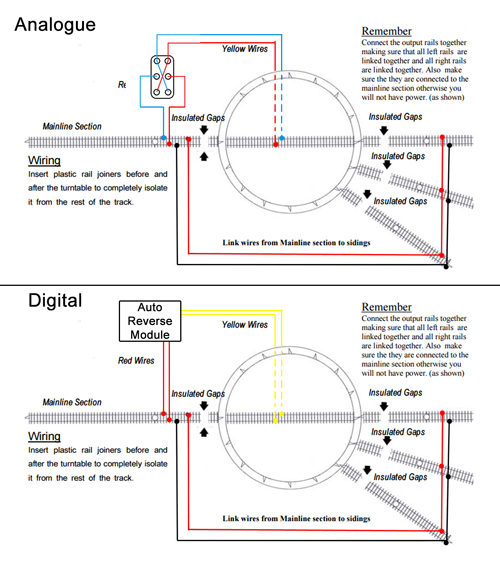
When wiring this up with analogue, if you want to store locomotives in the sidings for any length of time, take separate feeds to each line through an on/off switch.
James' next run of articles will be a ten-part series on getting -precisely- the right sleeper spacing...
|


We are always looking to make improvements to our website to try and improve the quality of your visit. We would welcome your feedback and suggestions, so please do not hesitate to e-mail our webmaster with your comments. Alternatively call us on 01903 884488.
Home Cookies Privacy Statement Terms & Conditions Site Map Site Guide
WEEE Regulations Glossary Careers & Jobs
Tel – +44 (0) 1903 884488 Fax – +44 (0) 1903 884377 E-Mail us – click here
Gaugemaster.com is a trading name of Gaugemaster Controls Ltd.
Registered in England No. 2714470, Registered office:
Gaugemaster House, Ford Road
Arundel, West Sussex, BN18 0BN, United Kingdom
VAT Reg. No. 587 8089 71
Copyright © 2003-2014 Gaugemaster Controls Ltd. All Rights Reserved.