|
| OO Scale | N Scale | G Scale | Z Scale | HO Scale | Slot Cars & R⁄C |
| |||||||
|
|||||||
| Home Page | |||||||
| BUY GIFT VOUCHERS | |||||||
| Products | |||||||
| Latest News | |||||||
| RIGHT LINES | |||||||
| Bargains | |||||||
| Downloads | |||||||
| Events | |||||||
| Careers & Jobs | |||||||
| Carriage Services | |||||||
| About Us | |||||||
| Contact Us | |||||||
| Pay Us A Visit | |||||||
| Meet The Staff | |||||||
| Links | |||||||

| SHOPPING BASKET |
Your shopping basket is empty. To add an item, click the "Buy" button
| YOUR ACCOUNT | ||
|
||||
 |
||||
| Prodigy Advance Digital System |
||||
| Cased Controllers |
||||
| Panel Mount Controllers |
||||
| Walkabout Controllers |
||||
| Modules & Transformers |
||||
| Scenics & Accessories |
||||
| Wiring & Electrical Components |
||||
| Tiny Signs | ||||
| Tools | ||||
 |
||||
| RECENTLY VIEWED |
| FM6526 - Spare Coupling with Rivet and Slot Fitting | ||
| PK35261 - Weatherproof On/Off Control Box (4 Accessories) | ||
| OD76SHL06WF - Stobart Lorry Tony McCoy | ||
| GF42-146 - Scenecraft Highley Station Yard Crane (Pre-Built) | ||
| GF42-072 - Scenecraft Depot Crane Black (Pre-Built) | ||
| More ›› |
| O Scale | Wargaming | Architectural | Narrow Gauge | Tools+ | ||
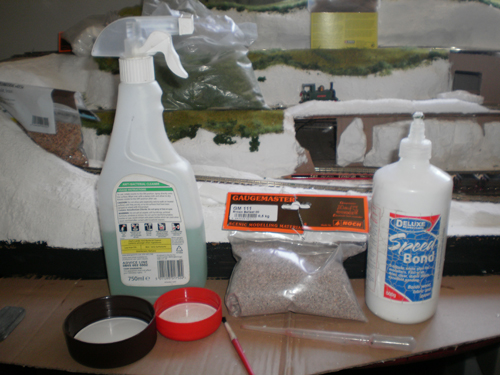
Ballasting Made Easy

MATT LOVELL explains how simple it is to ballast your track.
In a previous article I looked at using the Gaugemaster ballasted underlay and the points and crossing kits to lay the track on. In this issue I will be covering a more traditional method of ballasting the track and even adding some extra detail for enhanced realism.
Track ballasting is one of those long (but rewarding) jobs that needs care and time given to it. If it is done too quickly it can end up marring the look of the railway, and once it is laid and glued down it is quite difficult to remove and start again.
Step 1: Laying The Track
Once you have your track plan in mind you can secure your track to the baseboard using track pins. I personally use the GM67 Track Pins as they are quite thin, but have a big enough head to hold the sleeper.
Note: Adding a cork track bed will help deaden the sound of the running locomotive and help form the ballast shoulder later on.
Using a Pin Pusher helps as it is a simple and easy way to get the pins into the board, which save lots of hurt fingers!
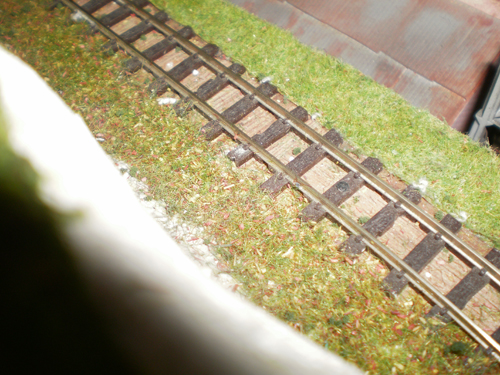
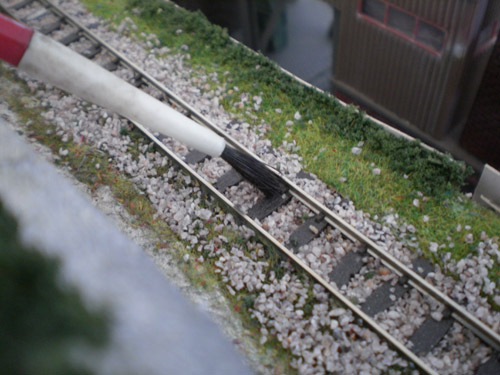
Step 2: Laying the Loose Ballast

Once you are happy with the laid track, you can now start applying the loose ballast between the rails and around the edges. Remember to work in small sections at a time otherwise you can get in quite a mess.
Using a medium size paint brush, brush the ballast stones into place making sure that no ballast is above the rail height or against the inside of the rails as this will distort the running of the trains.
Step 3a: Gluing the Ballast to the Board
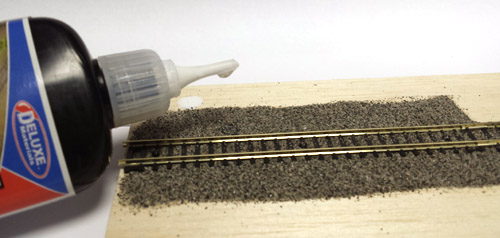
After all the stray ballast has been swept and you are happy with the look, grab a bottle of Deluxe Materials Ballast Bond and carefully dribble the adhesive onto the ballast. The glue will soak into theS ballast so you may need to add a bit more to cover it.
This is my preferred method as it is a much quicker and easier way to glue the ballast down.
Step 3b: Gluing the Ballast to the Board (Alternative Method)
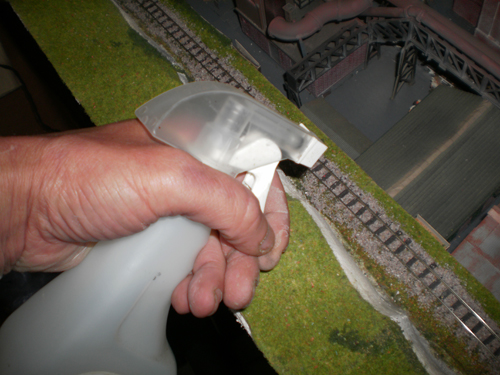
Add a small amount of washing up liquid to some water in a spray bottle. Spray this carefully over the top of the ballast from roughly six inches above the board. Too close and you will start blowing the stones around distorting your previous efforts. This breaks the surface tension and will allow the glue to penetrate between the ballast stones.
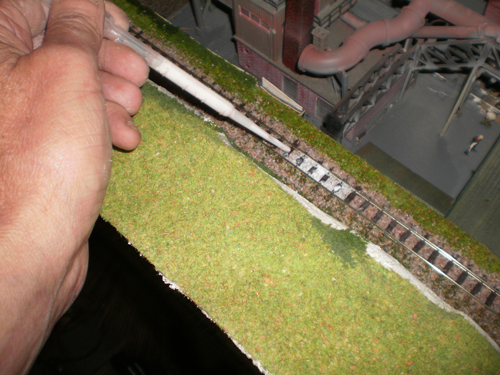
Once the track has been sprayed use a 50-50 mix of Speedbond and water, and using a syringe apply the mixture between the sleepers and on the ballast shoulder.
Leave this to dry for at least twenty-four hours to allow the glue to set rock hard. Remember you can work on multiple sections at a time.
Once the ballast is glued down, run a track rubber over the top to remove any stray glue which might be on the top of the rails.
Extra Details: Adding static grass to sidings (Optional)
This works nicely for Narrow Gauge sidings or any disused areas on the layout. This process is quite straight forward and looks great once completed.
Simply add some Static Grass to the dry ballast (Step 2) and sprinkle between the rails and over the outside of the sleepers.
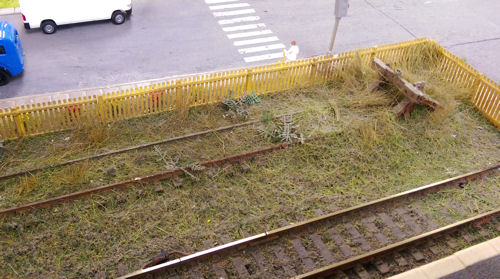
You will now have an overgrown siding which looks like the grass and weeds are protruding through the ballast.
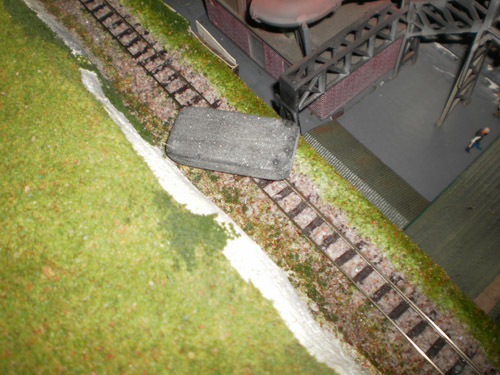
Extra Details: Darker Ballast for Works Areas (Optional)
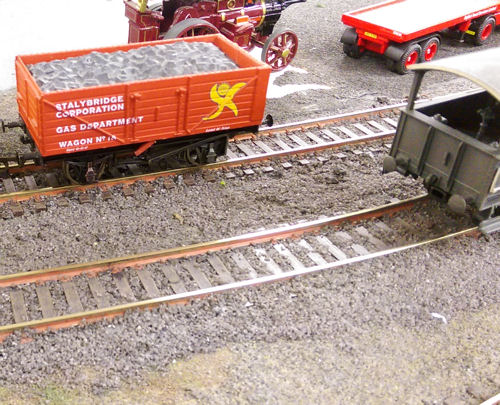
Another small detail which can be used is the addition of darker ballast for areas where locomotives sit or are worked on.
Using Dark Grey Ballast from Noch you can create a dirty looking area which looks great in any goods yard or railway depot. It can also be used around Coal Staithes with a mix of coal and ballast.
You can read up on more RIGHT LINES articles on ballast and underlay below:
|


We are always looking to make improvements to our website to try and improve the quality of your visit. We would welcome your feedback and suggestions, so please do not hesitate to e-mail our webmaster with your comments. Alternatively call us on 01903 884488.
Home Cookies Privacy Statement Terms & Conditions Site Map Site Guide
WEEE Regulations Glossary Careers & Jobs
Tel – +44 (0) 1903 884488 Fax – +44 (0) 1903 884377 E-Mail us – click here
Gaugemaster.com is a trading name of Gaugemaster Controls Ltd.
Registered in England No. 2714470, Registered office:
Gaugemaster House, Ford Road
Arundel, West Sussex, BN18 0BN, United Kingdom
VAT Reg. No. 587 8089 71
Copyright © 2003-2014 Gaugemaster Controls Ltd. All Rights Reserved.